A basic understanding of your soil texture—whether it is sandy, clayey or somewhere in between—will help you to irrigate and fertilize your landscape more efficiently and grow healthier plants. You can get a good sense of soil texture simply by handling it and looking at it closely, but this simple jar test can help provide a better understanding of your soil and help you accurately describe your soil when talking with horticulturists or soil experts.
A Simple Test for Soil Texture
What you need
1 quart jar, with a tight fitting screw-on lid
1 ½ cups of garden soil
2 cups of water
kitchen timer or watch
ruler or tape measure (with tenths or centimeter marked)
masking tape/or grease pen
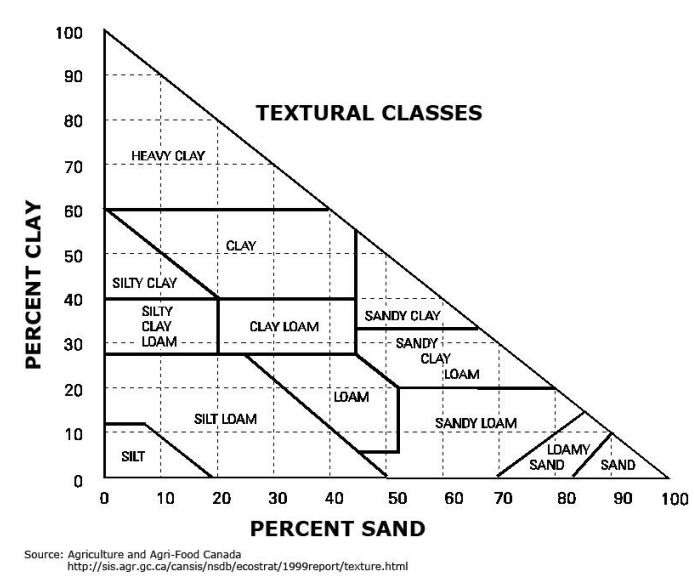
Soil Texture Triangle chart
The test
Pour 2 cups of water into jar.
Add 1 ½ cups of garden soil.
Tightly screw on jar lid.
Shake jar vigorously for at least 2 full minutes.
Set jar on flat surface and start timing.
After 1 minute, mark the 1st level of settled soil using masking tape or pen. This layer is SAND.
After 2 hours, mark the 2nd layer of settled soil. This layer is SILT.
After a day or two, mark the 3rd layer. This layer is CLAY.
The organic matter will settle out on top, or float.
Interpret the Results
Use a ruler to measure each layer.
Example SAND 1.75 inches SILT 1.50 inches CLAY .10 inches
Record the level of each layer, and the total thickness of all combined.
Total Depth (SAND + SILT + CLAY) = 3.35 inches
Multiply the depth of each layer and the total by 100 and record.
SAND 1.75 X 100 = 175 SILT 1.50 X 100 = 150 CLAY .10 X 100 = 10 Total Depth 3.35 X 100 = 335
Divide each result by the total depth. Use the percent of clay and sand to find your soil texture on the Soil Texture Triangle chart.